I enjoy operating CW. I use a set of Bencher paddles at my base station and like them very much. However they are big and not too conducive to portable operation.
So, I began looking for ideas on how to build a set of paddles that were smaller and easier to use for portable operation.
I also have a desire to someday put together a QRP station including paddles, that I can use when I am traveling. I believe the paddle set described in the following article satisfies this need. I received some excellent ideas on how to construct them from Vern, KB0SK who has experimented with various paddle construction ideas from time to time. When completed the paddles are about 2 inches wide, 3.5 inches long and 1-1/2 inches in height. Considerably maller for portable operation then my Bencher paddles.
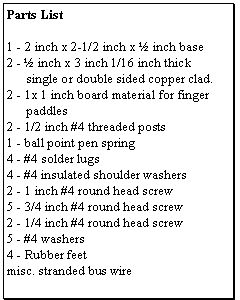
The paddles are constructed from parts that should be readily available in most junk
boxes or at most hamfests. They consist of a base, of sufficient weight to keep it
from sliding around when in use, and paddles made out of strips of single or double
sided copper clad material, washers, insulators, solder lugs, and screws.
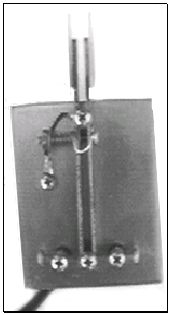
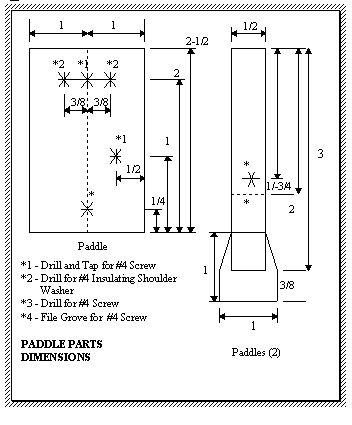
The picture to the left shows the completed paddles
and the Paddle Parts Dimension Drawing shows the
locations of features on the base and the construction
of the paddles.
You will need the ability to perform a few mechanical operations to build the paddles. I have divided their construction into four sections. Construction of the base, the paddles themselves, dot and dash contact posts, and final mechanical and electrical assembly.
I started by building the base first. I made mine out of a piece of 2 inch wide, 1/2 inch copper bus bar, 2-1/2 inches long. Dimensions and material for the base are not critical. Those in the article are ones that I have found to work out well and which give the paddles a good feel when in use.
Mark the center of the 2 inch dimension and locate two holes at 1/4 and 2 inches from the front edge of the base. Locate a third hole 1 inch in from the front edge and 1/2 inch from the right edge. Drill and tap all three holes for a #4 screw through the complete thickness of the material..
Locate two additional holes 2 inches from the front edge and 3/8 inch each side of the center line. These should be in line with the hole on the center line. Drill the holes for a #4 screw insulating shoulder washer. These are the shoulder washers used in the mounting kits for TO-66 style transistors. After cleaning up the base I sprayed it with a coat of clear enamel to protect it from tarnishing and to keep it looking neat.
That completes construction of the base.
Start construction of the paddles by cutting two strips of 1/16 inch thick single or double sidded copper clad material 3 inches long and 1/2 inch wide. These will form the basis for the paddles. Sand the edges of the material with fine sandpaper until smooth. Take care to maintain the two long edges parallel to each other. Drill a hole to provide clearance for a #4 screw 1-3/4 inches from one end in each of the pieces 1/4 inch in from the edge. Using a small round file or a knife cut a groove in one side of the copper clad material 2 inches in from the end of each of the pieces. This groove will ride on a #4 screw and provide the pivot point for the paddles as well as keeping them from sliding back and forth when they are moved. If you are using single sided clad, make sure the grove is in the non-clad side of the material. I wanted a little more surface area for my fingers so I made two additional pieces out of circuit board material to enlarge the finger contact area of the paddles. Cut two pieces of 1 inch wide material about 1 inch long. Taper one end to match the width of the copper clad material which should be approximately 1/2 inch wide. I used epoxy to glue one of these to each of the clad strips so that it protrudes 3/8 inch out from the end of the paddle. Make sure these are glued on the clad side of the material if you are using single sided clad. This completes construction of the paddles.
The contacts are made from two 1 inch threaded stand-off posts and #4 screws. Drill and tap a hole for a #4 screw through each of the stand-offs 1/4 inch from each end. These form the holders for the dot and dash contacts. Screw a 3/4 inch #4 screw into each of the tapped holes.
Pressure to keep the paddle sections together is provided by a spring held in place with a 3/4 inch #4 screw and nut. Place the screw through the hole in one of the paddle pieces with copper clad side toward the screw head. Place the second paddle piece on the screw with the non-copper clad side toward the screw head. Cut a spring form a ball point pen in half and place it over the screw followed by a washer and nut. Leave the tension on the spring as low as possible until final assembly.
Place two #4 washers over each of two 1 inch #4 screws. Start the threads of each of them into the two threaded holes in the center line of the paddle base. Place the paddle assembly over the two screws with one of the washers of each of the screws on the bottom edge of the paddle and the other on the top. Tighten the screws until the washers are in contact with the top of the paddles. These washers provide the surface for the paddles to slide on when moved. The washer should ride on each of the paddle pieces and the grove cut in each paddle piece should ride on the center screw that is 1/2 inch from the front edge. Tighten the tension on the spring to hold the paddles together during continued assembly.
Place a 3/4 inch #4 screw through each of the tapped holes in the dot and dash contact posts. Place a insulated shoulder washer in the top and bottom side of one of the holes located 3/8 inch off of the base center line. Put a #4 solder lug over a 3/4 inch #4 screw and then through the insulted shoulder washers from the bottom side. Thread it into the contact post on the top side with the screw end of the contact adjustment screw toward the paddle. Repeat this operation for the other contact post. Using a 1/4 inch #4 screw fasten a #4 solder lug in the hole located 1/2 inch from the right edge of the base. Fasten another #4 solder lug in the same hole on the bottom side of the base using a second 1/4 inch #4 screw. This is the ground terminal for the paddles. Adhere rubber feet to each corner of the bottom of the base.
Solder a piece of stranded bus wire from the ground lug on the top of the base to the clad side of the right paddle at the paddle pivot point. Make sure there is a service loop on the lead so no undue paddle pressure is needed to move the paddle. Solder a second piece of braided bus wire in a loop over the top of the paddle pieces tying the two clad surfaces together. Again make sure a service loop is left and that the connection is made at the pivot point.
Connections for the dot and dash contacts and to the common terminal are made to the solder lugs on the bottom side of the base. For most installations the dot connection will be to the left contact post and the dash connection will be to the right contact post. Make the cable and connector for these connections to suit your installation. Use a piece of lacing cord or string to provide strain relief for the cable at the paddle end.
There are only three adjustments on the paddle. Two for the contact spacing on the dot
and dash contact posts and one for the paddle feel which is set by the spring tension.
After the adjustment for the dot and dash contacts are complete lock them in place by
threading a 1/2 inch #4 screw into the top of each of the threaded posts. Make sure you
loosen these if you want to readjust the contact spacing.
Make sure you buff down the copper clad area on the paddles where they make contact with
the dot and dash contact screws to assure good electrical contact. I have not experienced
any problems with mine but they may have to be cleaned after prolonged use or storage to
assure good contact.
I have found the feel of the paddles to be very acceptable and I look forward to many hours
of enjoyment from them.